
|
Everyone knows how the usage of proper decorators can get you the desired look and feel. Have you been paying attention to the JIRA Decorators as well? If not, read on.. Let us assume we are developing a simple webwork plugin and have added a web item that points to the new action. This is how the respective modules look in the atlassian-plugin.xml. <webwork1 key="j-tricks-demo-action" name="JTricks Demo Action" i18n-name-key="j-tricks-demo-action.name"> <description key="j-tricks-demo-action.description">The JTricks Demo Action Plugin</description> <actions> <action name="com.jtricks.jira.webwork.JTricksDemoAction" alias="JTricksDemoAction"> <view name="input">/templates/j-tricks-demo-action/jtricksdemoaction/input.vm</view> </action> </actions> </webwork1> <web-section key="jtricks-demo-section" name="JTricks Section" location="admin_plugins_menu" i18n-name-key="j-tricks-section.name" weight="900"> <label key="j-tricks-section.label"></label> <description>J Tricks Section</description> <tooltip>J Tricks - Little JIRA Tricks</tooltip> </web-section> <web-item name="JTricks Demo" i18n-name-key="j-tricks-demo.name" key="j-tricks-demo" section="admin_plugins_menu/jtricks-demo-section" weight="1000"> <description key="j-tricks-demo.description">The JTricks Demo Plugin</description> <label key="j-tricks-demo.label"></label> <link linkId="j-tricks-demo-link">/secure/JTricksDemoAction!default.jspa</link> </web-item> As you see, we have a webwork action with an input view. A web section under Administration > Plugins and a web item under the new section which points to our action. On clicking on the new item, the input view is rendered. All usual stuff! Let us assume our input view is pretty simple: <html> <head> <title>J-Tricks Demo</title> </head> <body> <h1>JTricks Demo</h1> <br><br> How is the look and feel? </body> </html> After deploying this little plugin, we will see the glorious menu item we created like this. 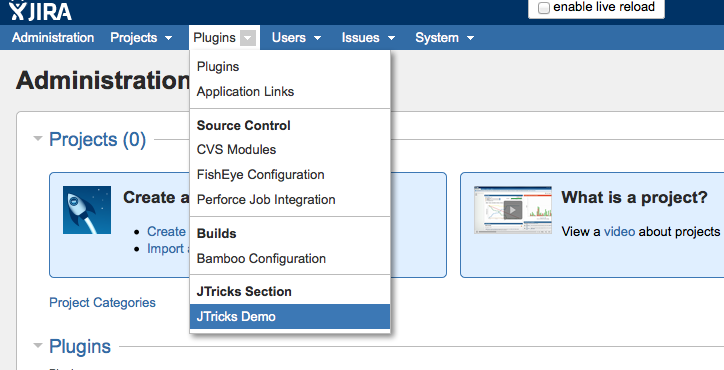 *For more details on creating web items, see the previous tutorial. Click on the menu item and you will see our view page rendered as shown below. 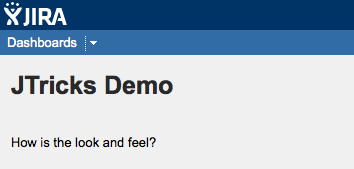 Now, wait a minute! We expect the look and feel to be a bit different, right? Our link is under Administration > Plugins but we seem to have gone back to dashboard. That's where the decorators come into the picture (literally!). JIRA gives a number of decorators which can alter the look and feel a bit. All you need to do is to find the appropriate one and add it as a metadata on the HTML document using the mata tags. A full list of decorators can be found here. And from the list, as we need to be in the admin section, we can choose "atl.admin". All we need to do is to add the following under the HEAD of the HTML document. <meta name="decorator" content="atl.admin" /> The updated input.vm will look like this: <html> <head> <title>J-Tricks Demo</title> <meta name="decorator" content="atl.admin" /> </head> <body> <h1>JTricks Demo</h1> <br><br> How is the look and feel? </body> </html> And see how the view changes while clicking on our demo web-item: 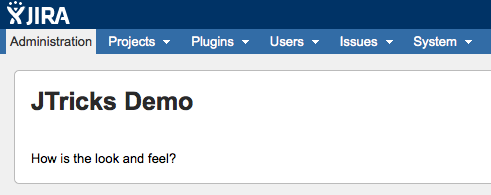 That's better, right? But still, why is it showing under Administration section and not under Plugins section? That is where the next metadata comes in. The name of this meta tag is admin.active.section and all you need to do is to add this meta tag with content as our section. <meta content="admin_plugins_menu/jtricks-demo-section" name="admin.active.section"> Here is the updated input.vm file: <html> <head> <title>J-Tricks Demo</title> <meta name="decorator" content="atl.admin" /> <meta content="admin_plugins_menu/jtricks-demo-section" name="admin.active.section"> </head> <body> <h1>JTricks Demo</h1> <br><br> How is the look and feel? </body> </html> And now the page looks like this: 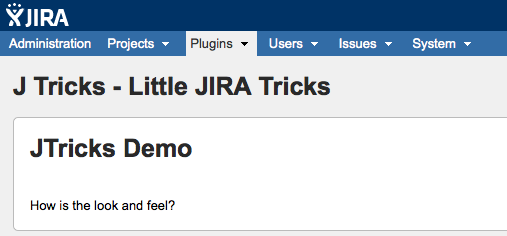 Simple, eh? Just for fun, let us change the active section to something else, let us say the Source section. <meta content="admin_plugins_menu/source_control" name="admin.active.section"> Now the page looks like this. 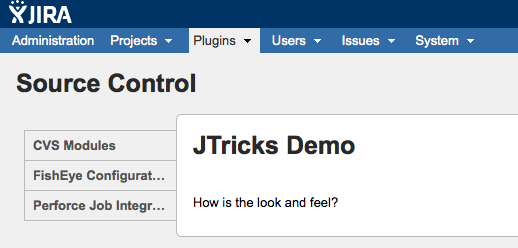 This is an example where there are more than one tab in the same section. And as you can see, our page is in the right section but none of the tags are selected. And there comes our last metadata in this recipe: admin.active.tab. Let us add the following meta tag with the content as the web-item link id of CVS Modules (I got the link id from the relevant plugin but that's not important ;) Note that it is the link id and not the key that you need to use here). <meta content="cvs_modules" name="admin.active.tab"> Out input.vm is now: <html> <head> <title>J-Tricks Demo</title> <meta name="decorator" content="atl.admin" /> <meta content="admin_plugins_menu/source_control" name="admin.active.section"> <meta content="cvs_modules" name="admin.active.tab"> </head> <body> <h1>JTricks Demo</h1> <br><br> How is the look and feel? </body> </html> And the page now looks like this: 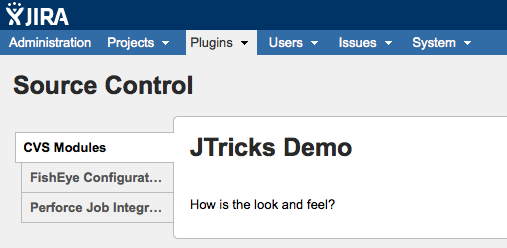 How's that? Happy? If not, find the nearest Starbucks and get a coffee ;) In short, you can simply add the relevant meta tags to make sure the page that you rendered appears in the appropriate style, section. K, gotta go! Hurricane Sandy is on its way!! Have a look at the JIRA Development Cookbook for similar recipes. You can download the source from the zip file attached below.
25 Comments
J-Tricks
10/29/2012 12:46:30 pm
I have tested it only in 5.x but "atl.admin" is available from 4.4 I guess.
Onkar
11/2/2012 12:57:06 pm
Hi Jobin,
J-Tricks
11/2/2012 03:13:29 pm
Do you have more than one item in your new section? The tabs will appear only if there is more than one item in the section.
Jira
11/3/2012 06:19:17 am
projectgroup4 is a default section in jira project configuration and has many other sub items in it.
J-Tricks
11/3/2012 04:45:40 pm
Ah I see. Which version of JIRA is it?
Jira
11/5/2012 05:23:50 am
4.4.1
Jira
11/6/2012 06:21:25 am
Got the info here : https://answers.atlassian.com/questions/98475/project-configuration-tab-panel-error
J-Tricks
11/6/2012 12:32:42 pm
Oh yes, you need to use link id!
Alexej Geldt
7/23/2013 10:59:00 pm
Thank you for this guide.
J-Tricks
7/23/2013 11:35:52 pm
As long as your new web-section is grouped along with atleast one more web-section (under the same location), tabs will automatically appear.
Alexej Geldt
7/24/2013 02:03:49 am
hm. I am not sure if we understand each other.
J-Tricks
7/24/2013 03:49:25 am
Sorry, meant to say "As long as your new web-item is grouped along with atleast one more web-item (under the same section), tabs will automatically appear"
Alexej Geldt
7/24/2013 03:52:13 am
Thank you, this makes sense. I'm going to try this later today and report.
Bogdan
8/19/2013 01:36:09 am
Hi,
J-Tricks
8/27/2013 08:53:59 am
Unfortunately, that is not possible. Maybe you can tweak some CSS to do that but not in the current state. 9/2/2013 11:34:15 pm
Hey, thanks for this tutorial. The JIRA Decorators are actually a new concept for me. Never used it before. After going through your tutorial, I feel like giving it a try. I am going to take a look at the full list of decorators now.
Youcef
12/31/2013 12:26:51 am
Thks a lot
Nandhini
3/17/2015 03:54:25 am
whether there is any tutorial available to learn about mechanism or communication between the java class(extends JTricksDemoAction) and atlassian plugin.xml
saurabh
9/1/2017 11:38:54 am
is it still working?
J-Tricks
9/4/2017 08:23:52 am
It should be!
J-Tricks
1/14/2019 09:13:42 pm
You should definitely be minifying what you can - all the web resources like javascript and css. In fact, the Atlassian Plugin SDK already does it while building a plugin and all the web resources in JIRA itself are already minified. Your comment will be posted after it is approved.
Leave a Reply. |
AuthorJobin Kuruvilla - Works in Adaptavist as Head of DevOps Professional Services. Categories
All
Archives
October 2016
|
||
 RSS Feed