
Simplified Planner > Planner Usage > Modifying a Plan
A plan can be modified in many different ways. Following are the things that can do when you are viewing a plan. If you are not sure about the various elements in a plan, check out viewing a plan first!
Note that any changes you make on the plan has to be saved using the Save button. You can wait until you make all the desired changes to hit the Save button.
Changes can also be done directly on the issues and you can use the Reload button to load those changes into the plan. Make sure all your current changes are saved before the plan is reloaded. More on those will be explained later.
Editing Issues
Adding Issues
Adding User
Adding Milestone
User Capacity Planning
Other Actions
Editing Issues
An issue on the plan can be modified in many different ways. As mentioned earlier, the focus is on Start Date, End Date and Estimates. Here are the things that you can do to modify an issue on the plan.
Changing the start and end date: The size of the issue bar can be altered by dragging either ends to a different date. You should click on the bar to select an issue (make sure the bar turns yellow in color) before dragging the ends.
Changing the start and end date: The size of the issue bar can be altered by dragging either ends to a different date. You should click on the bar to select an issue (make sure the bar turns yellow in color) before dragging the ends.

It is also possible to hold the entire bar and move it to a different date (to change the start and end dates simultaneously, without altering the days in between).
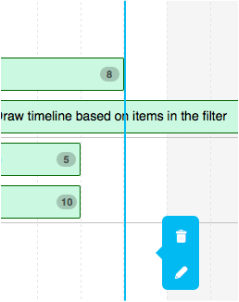
Changing the summary or estimate: Summary, Estimate, Start and End Dates of an issue can be modified by double clicking on the item. Once the item is selected, double click on it to get the Update dialog, as shown below:
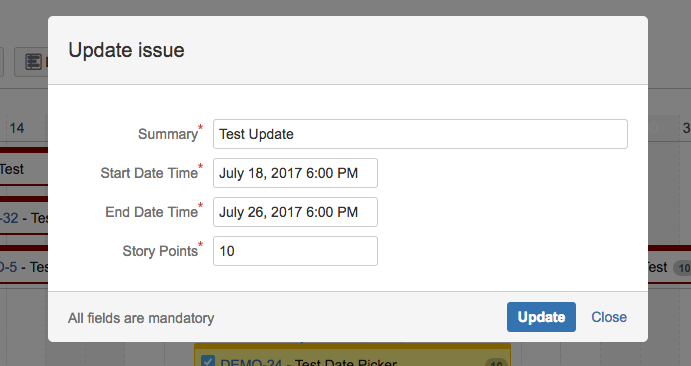
If you need to edit any other attributes, you need to open the issue in a different window and use the JIRA's edit operation. Only summary, estimate and dates are visible on the plan and hence allowed to be edited inside the plan.
After clicking on the OK button, the plan is updated with the new summary and estimate. Total estimate on the assignee is automatically recalculated.
Changing the assignee: Similar to changing dates, you can drag and drop the issue bar under a different assignee group, to change the assignee of the issue. Upon saving the plan, the issue will be modified with the new assignee.
Similar to updating estimates, user load is automatically recalculated when the assignee is changed.
Adding Issues
A new issue can be added into the plan in two different ways.
- Using the +Issue button on the plan toolbar: This option will open up a new Create Issue dialog.
- By double clicking on the timeline. This is a recommended option, as it pre-populates the assignee and start date, based on the area clicked on the timeline.
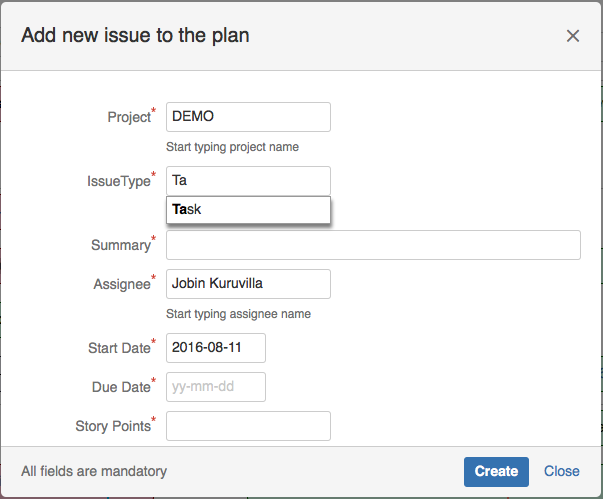
In both cases, the Create Issue dialog contains the following fields.
- Project: Start typing the project name and pick an item from the list
- IssueType: Start typing the issue type name and pick an item from the list
- Summary: Summary of the issue
- Assignee: Start typing the assignee name and pick an item from the list
- Custom Field holding Start Date: Use the date picker to select the start date
- Custom Field holding End Date: Use the date picker to select the end date
- Custom Field holding estimate: Type a number value as the estimate
On Clicking 'Create', the issue is created in JIRA and added into the plan.
Adding User
A user is displayed on the plan if the user is an assignee on atleast one issue in the associated filter. And you can reassign issues to users who are already on the plan.
What if you want to add a new user, who is not yet assigned any issues, to the plan?
You can use the +User button on the plan toolbar. This will bring up a new dialog to select a new user, as shown below.
What if you want to add a new user, who is not yet assigned any issues, to the plan?
You can use the +User button on the plan toolbar. This will bring up a new dialog to select a new user, as shown below.
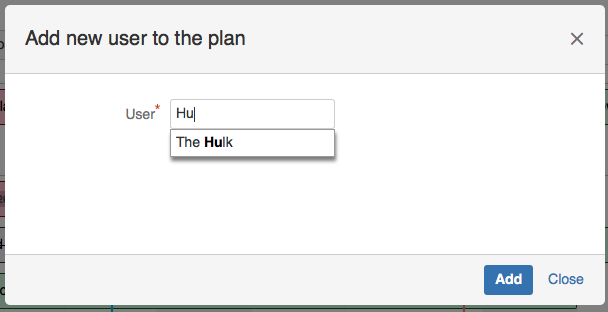
Up on selecting the user and clicking on 'Add', an empty user row is added on the plan, as shown below.

Adding Milestone
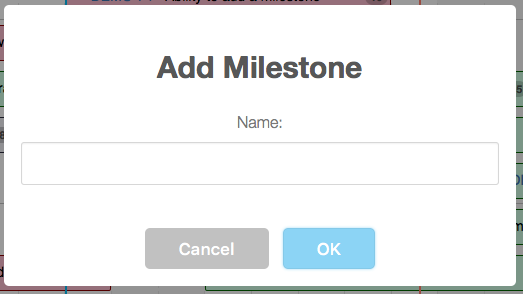
If you want to add a milestone, be it a sprint end date, an upcoming release or a national holiday, it can be don using +Milestone button on the plan toolbar.
The Add Milestone dialog takes a name, as shown below:
The Add Milestone dialog takes a name, as shown below:
|
Once the milestone is created, it appears as a blue vertical bar in the timeline. By default, the milestone is created in the middle of current date. You can drag the blue bar to the appropriate date and the changes will be saved when the plan is saved.
It is possible to edit the milestone name or delete a milestone, using the toolbar highlighted on the right side of the blue bar, when you click on it. Delete operation will ask for a confirmation whereas the Edit operation will show the dialog to update the current name. Note that the milestones are specific to a plan and not a filter. It is possible to have multiple plans, against the same filter, with different milestones defined on them. |
|
User Capacity Planning
There are 2 pieces to capacity planning in the simplified planner.
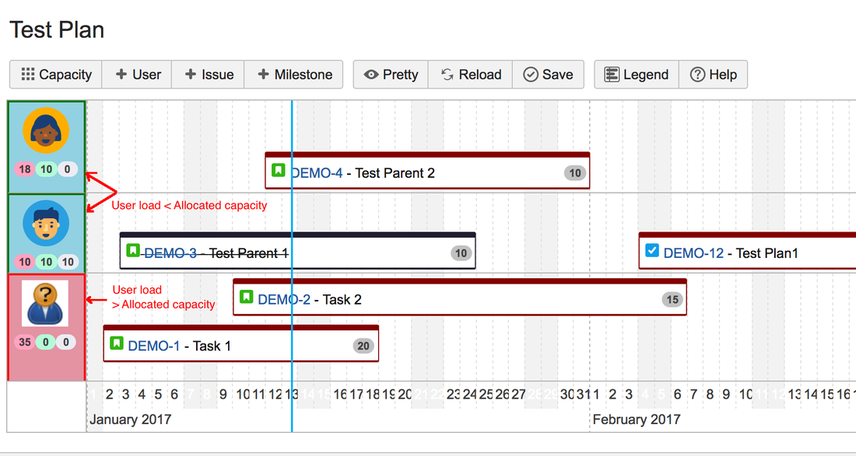
Allocated Capacity Vs Load
A capacity can be defined against a user, per plan, and the user profile will be shown in different colors based on the load. If the user load is more than the capacity, the background will be light red. If the user load is less than or equal to the assigned capacity, the background will be light green. And, if the capacity is not set for a user, the background will remain white.
The capacity is set using the Capacity button on the tool bar, as shown below.
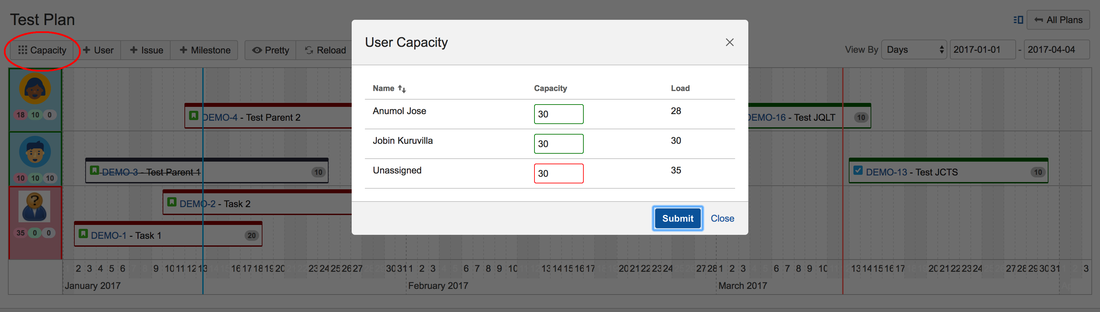
On the capacity screen, you can set the capacity for a user and also compare it with the current load for that user. It is also possible to sort the columns based user name, capacity or load. Once the form is submitted, the user profile will be redrawn with the appropriate background based on the current user load and the updated capacity.
The new capacity values will not be saved to the plan until the plan is saved using the Save button.
The user profile background colors will be readjusted, as estimate values are edited or issues are dragged and dropped to other users. Checkout the below video to see this in action.
Tracking the user Load
The second part of capacity planning in Simplified Planner is to track the current user load. Each assignee will have 3 totals, one each for overdue issues, due issues and done issues. The total load, compared against the capacity, will be the sum of these 3 totals.
The 3 totals are calculated as the sum of estimates on all issues in a group and is displayed under the assignee.
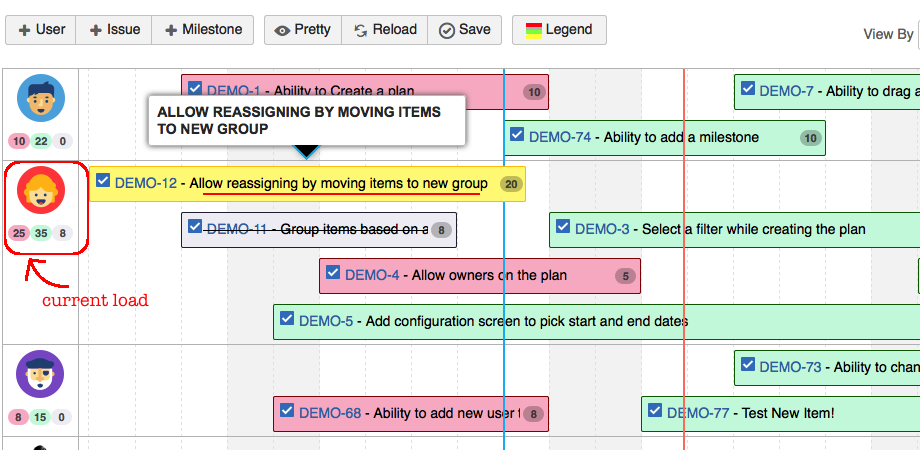
This helps to determine the current load on a user and, there by, get better visibility on the progress made by a user.
What to look for?
During planning, plan administrators can set capacity for each user and compare the user load with the allocated capacity. The user profile background highlights overloaded users and helps to spread the load evenly. It is also possible to set a different capacity for each user, there by accommodating days off and varying allocations between teams. This, in turn, helps to do proper capacity planning.
Once the planning is done, the user load tracking helps to keep track of the progress made by each user. In an ideal scenario, no one misses the due date (End Date on the issue) and the issue cards are always green (with a future end date) or grey (done). But that is not always the case. The planner highlights the total estimate of overdue issues (in red) and you can easily find out users with the maximum number of overdue estimates. Perhaps, they are overloaded? Or they need more support from the team?
You can also compare the totals between the users and find out who is overloaded or under utilized, at any given point in time.
If you want to reassign stories, just drag the story and drop it under the new assignee to see the new totals. The instant feedback makes capacity planning a lot easier.
Other Actions
We have already seen how to add issues, users or milestones into a pan. There are also a few other options available on the plan.
Pretty
This option allows the user to fit all issues in the plan to the current window. The Start Date and the End Date of the timeline is calculated based on the start and end date of issues in the timeline.
Start date of the timeline will be the earliest start date of all issues in the timeline. Similarly, end date of the timeline will be the latest end date of all issues in the timeline.
On the initial load, the plan is shown in the 'Pretty' mode. You have the option to change the start and end dates on the plan to zoom into certain dates but you can always use the 'Pretty' button to go back to the initial view.
Reload
You can use this option to reload the plan by discarding all the changes made. The user will be asked for confirmation and use this option only if you do not have changes that you want to preserve.
Save
Use this option to save the plan. When the plan is saved, changes made on the issue bars are saved into the JIRA issues and the changes made on the milestones are saved into the plan itself.
If there are any errors while saving a plan, it will be displayed to the user during the Save operation.
Legend
As discussed earlier, an issue can be shown in 4 colors. The legend button opens up a dialog explaining the different colors, as shown below.
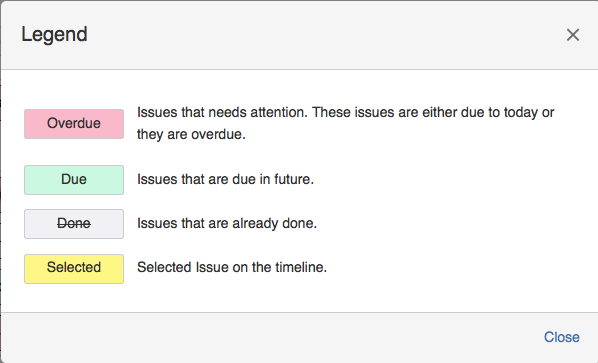
The coloring scheme will help you track the progress of the plan, in a quick glance.
View By
The View By dropdown has 3 values - Days, Weeks and Months. You can pick different options to adjust the scale on the timeline.
Start or End Dates on the plan
As discussed earlier, we can use the start and end dates on the plan, to drill down into specific dates on the plan. For example, the start date on the plan can be adjusted as shown below.
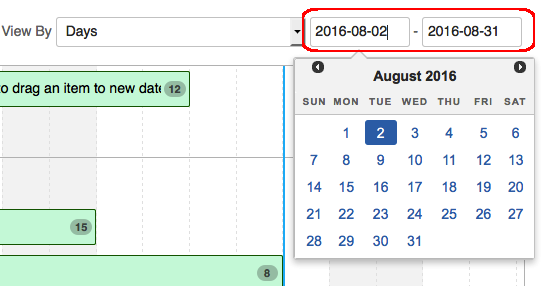
The plan will be redrawn to show the new dates. You can go back to the original view (and dates) using the Pretty button.