J tricks - Little JIRA Tricks
  • Home
  • Plugins ↓
    • JQL Tricks Plugin
      • JQL Tricks Plugin - Cloud
        • JQLT Cloud Installation
        • JQLT Cloud Configuration
        • JQLT Cloud Usage
        • JQLT Cloud License
        • JQLT Cloud FAQ
      • JQL Tricks Plugin - DC
        • JQLT DC Installation
        • JQLT DC Configuration
        • JQLT DC Usage
          • JQLT Issue Functions
          • JQLT Subtask Functions
          • JQLT Links Functions
          • JQLT Development Functions
          • JQLT Worklog Functions
          • JQLT Project Functions
          • JQLT Component Functions
          • JQLT Version Functions
          • JQLT Group Functions
          • JQLT User Functions
          • JQLT Date Functions
        • JQLT DC License
        • JQLT DC FAQ
        • JQLT DC Known Issues
        • JQLT DC Performance
      • JQL Tricks Cloud Migration
    • Simplified Planner
      • J-Planner Installation
      • J-Planner Configuration
      • J-Planner Usage
        • Creating a plan
        • Editing a plan
        • Deleting a plan
        • Viewing a plan
        • Modifying a plan
      • J-Planner FAQ
    • Atla-Search Plugin
      • Atla-Search Installation
      • Atla-Search Configuration
      • Atla-Search Usage
      • Atla-Search License
      • Atla-Search FAQ
    • Copy to subtask Plugin
    • All Plugins
  • Tutorials
  • The Book
  • Contact Us

Simplified Planner - Viewing a Plan

Simplified Planner > Planner Usage > Viewing a Plan

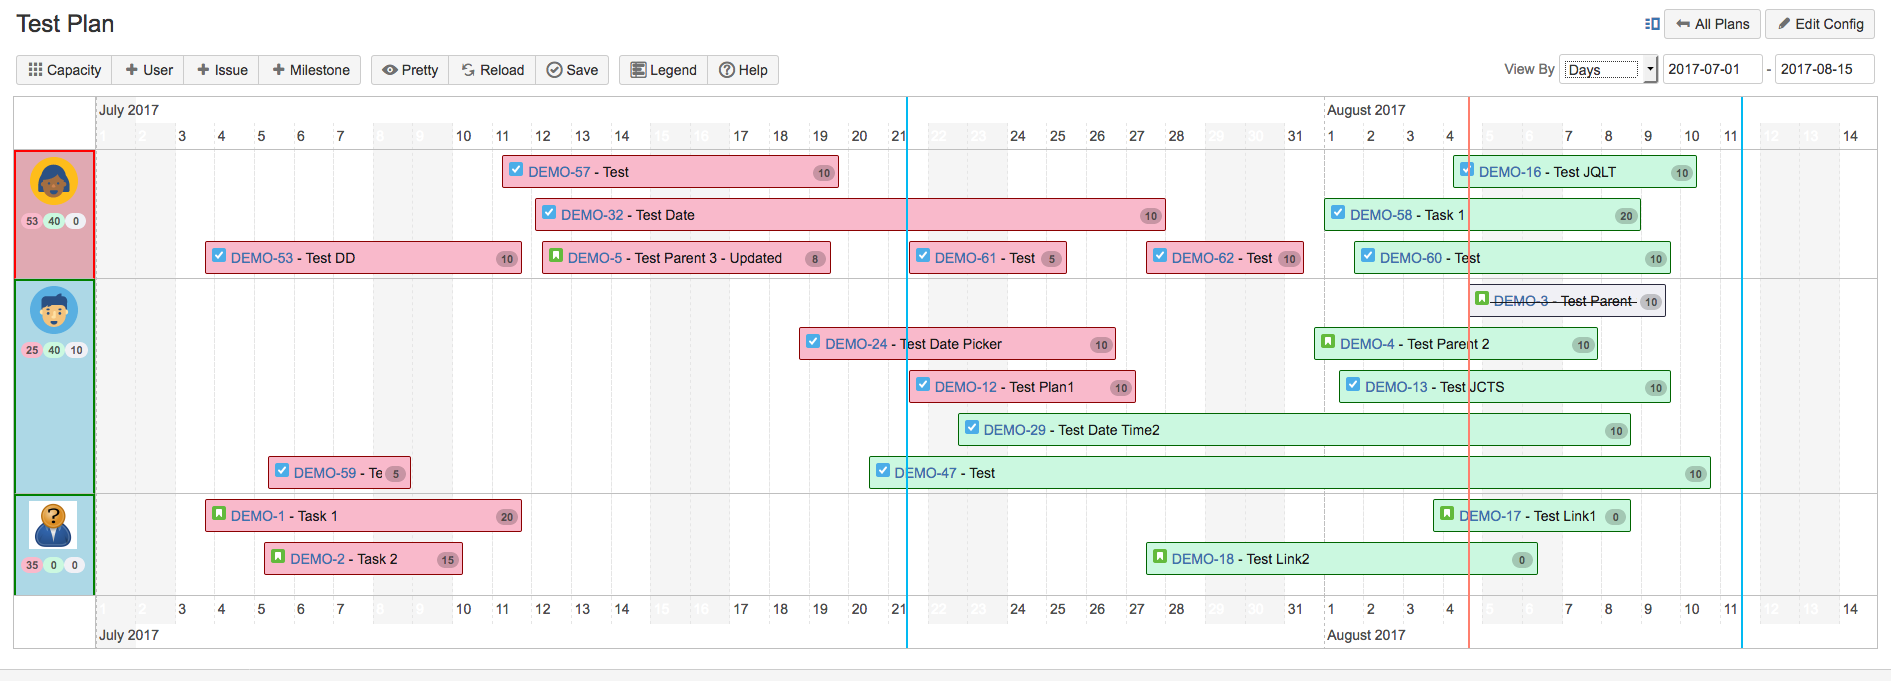
When a plan is viewed, each issue in the associated filter is drawn as a bar in the timeline. Following are the key things to note.
  1. An issue is drawn from its Start Date to the End Date. Fields holding these dates are configured in the plugin configuration page.
  2. If the Start Date is empty on the issue, the issue is drawn from the current date.
  3. If the End Date is empty on the issue, the issue is drawn 5 days from Start Date or current date, depending on whether Start Date is set on the issue or not.
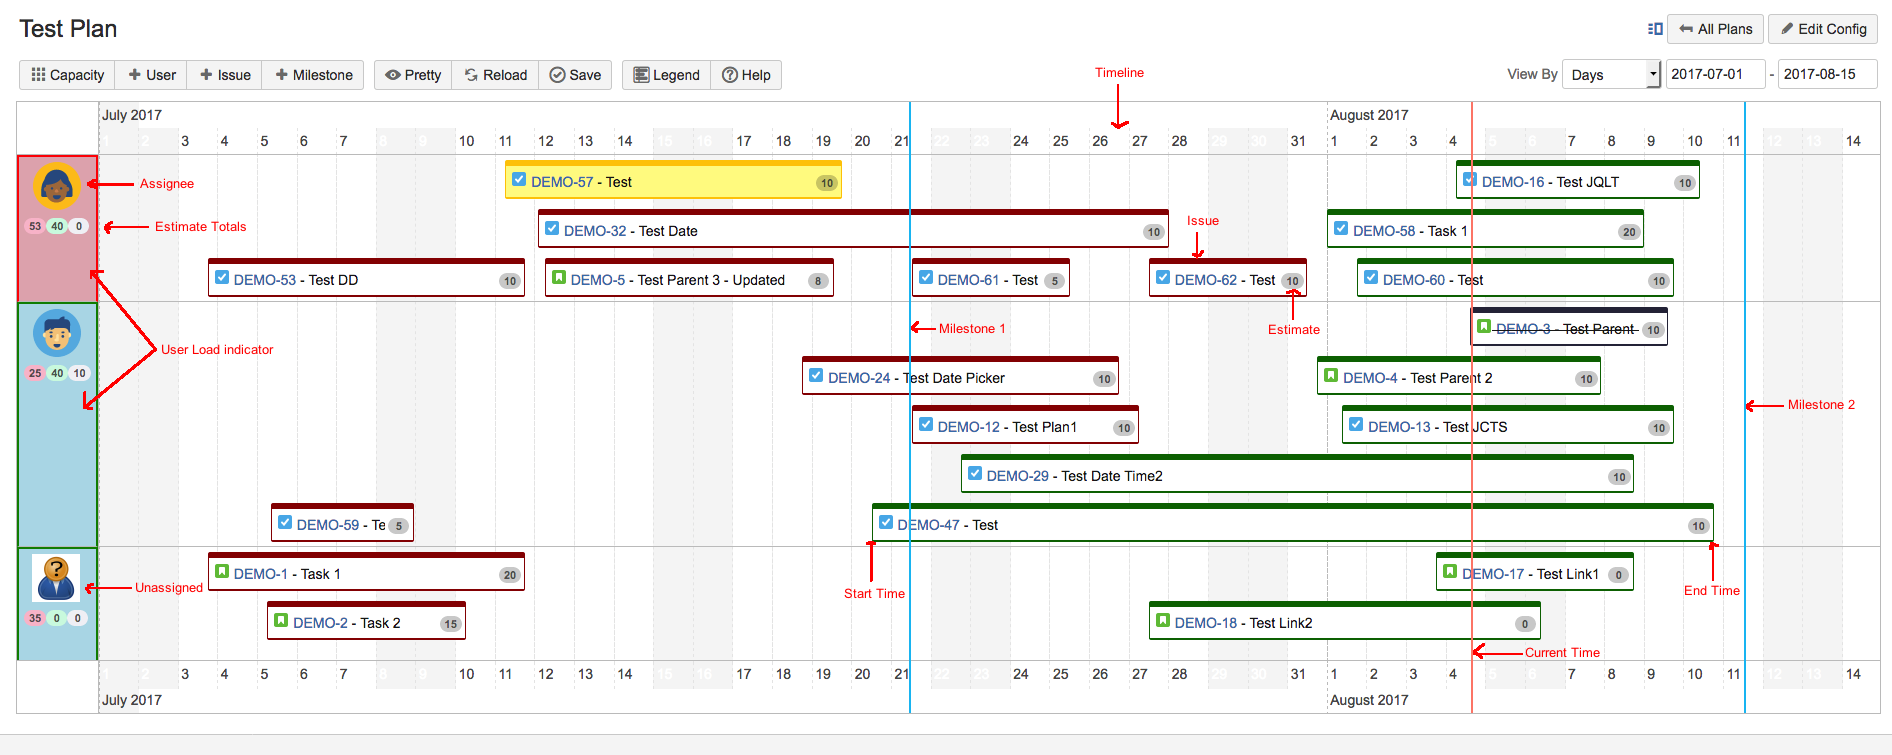
  4. The issue type, key, summary and estimate are shown on the ticket. Estimate will be shown only if an estimation statistic is selected on the plan.
  5. An issue can be shown in 4 colors, as explained when you click on the Legend button. The coloring scheme will help you track the progress of the plan, in a quick glance.
  6. Current time will be shown on the timeline as an orange vertical bar. Hovering over the bar will show the time.
  7. Custom milestones will be shown as blue bars. Hovering over the bar will show the milestone name.
  8. View By field shows the time scale shown in the timeline. It could be Days, Weeks or Months.
  9. Beginning and End dates on the timeline is shown in the date fields. If you configured a start and end date on the plan, the beginning and end dates defaults to those.

    If not, plan start and end dates are automatically calculated based on the start and end date of issues in the timeline. Start date of the timeline will be the earliest start date of all issues in the timeline. Similarly, end date of the timeline will be the latest end date of all issues in the timeline.
  10. Issues are grouped based on assignee, ordered alphabetically based on user names. Unassigned issues are grouped together at the bottom of the timeline. Assignee profile is displayed at the beginning of each row.
  11. If an estimation statistic is selected on the plan, sum of estimates on all issues in a group (for an assignee) is calculated and displayed under the assignee.

    Each assignee will have 3 totals, one each for overdue issues, due issues and done issues.

    This helps to determine the load on a user and, there by, helps to do capacity planning. Separating the total estimates over the 3 categories gives better visibility on the progress made by a user.
  12. From version 2.1, assignee profile will have a background color based on the user capacity. If the user load is more than the capacity, the background will be light red. If the user load is less than or equal to the assigned capacity, the background will be light green. And, if the capacity is not set for a user, the background will remain white.
The above details are annotated in the below picture.

Picture
The look and feel of the plan will change if the selected theme is Classic.

Picture

SUPPORT
APPS
TUTORIALS
THE BOOK
© J-Tricks