J tricks - Little JIRA Tricks
  • Home
  • Plugins ↓
    • JQL Tricks Plugin
      • JQL Tricks Plugin - Cloud
        • JQLT Cloud Installation
        • JQLT Cloud Configuration
        • JQLT Cloud Usage
        • JQLT Cloud License
        • JQLT Cloud FAQ
      • JQL Tricks Plugin - DC
        • JQLT DC Installation
        • JQLT DC Configuration
        • JQLT DC Usage
          • JQLT Issue Functions
          • JQLT Subtask Functions
          • JQLT Links Functions
          • JQLT Development Functions
          • JQLT Worklog Functions
          • JQLT Project Functions
          • JQLT Component Functions
          • JQLT Version Functions
          • JQLT Group Functions
          • JQLT User Functions
          • JQLT Date Functions
        • JQLT DC License
        • JQLT DC FAQ
        • JQLT DC Known Issues
        • JQLT DC Performance
      • JQL Tricks Cloud Migration
    • Simplified Planner
      • J-Planner Installation
      • J-Planner Configuration
      • J-Planner Usage
        • Creating a plan
        • Editing a plan
        • Deleting a plan
        • Viewing a plan
        • Modifying a plan
      • J-Planner FAQ
    • Atla-Search Plugin
      • Atla-Search Installation
      • Atla-Search Configuration
      • Atla-Search Usage
      • Atla-Search License
      • Atla-Search FAQ
    • Heroku for Compass App
      • Heroku for Compass Installation
      • Heroku for Compass Configuration
      • Heroku for Compass Usage
    • Copy to subtask Plugin
    • All Plugins
  • Tutorials
  • The Book
  • Contact Us

Simplified Planner - Configuration

The configuration of the plugin is fairly straightforward. You can navigate to the configuration screen either by clicking on the Configure button when the plugin is selected in UPM or by navigating to Administration > Simplified Planner > Planner Configuration.

Note: You need to be JIRA Administrator to configure the plugin.

Before configuring the plugin, make sure you identify 2 date fields that will be used as the 'Start Date' and 'End Date' on JIRA tickets. These fields could be custom fields created in JIRA or the standard Due Date field.

If you do not have a custom date fields that can be used, make sure you configure one, as mentioned at https://confluence.atlassian.com/adminjiraserver071/adding-a-custom-field-802592519.html. Select the type as Date Picker.

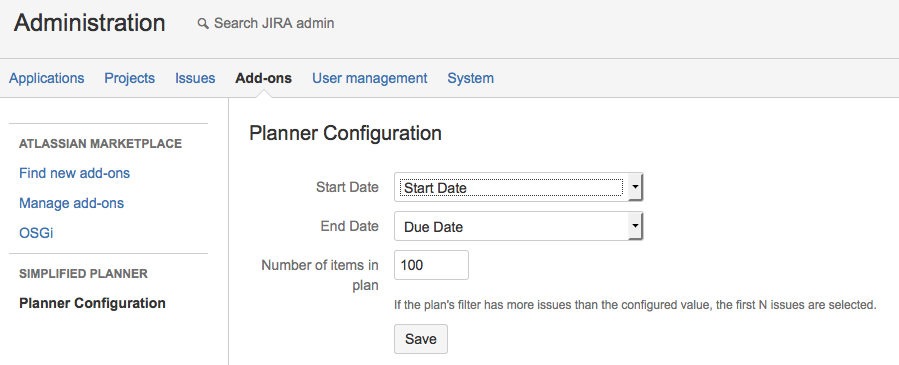
The configuration screen has 3 fields:
  1. Start Date: This will be a list of Date fields, including the system 'Due Date' field. Please select one of the fields to be the start date on issues.
  2. End Date: This will be a list of Date fields, including the system 'Due Date' field. Please select one of the fields to be the start date on issues. Make sure the 'End Date' is not the same as the 'Start Date'.
  3. Number of items in plan: Administrator can configure the maximum number of items that will be visible on a plan. This is useful if you want to prevent users creating plans with thousands of issues, thereby causing a performance overhead. Default value is 100.
There is no limit to the number of items because the actual value will depend on the available system resources. It is recommended to create plans with manageable number of items, for better performance, as well as for a better chance to succeed. Tracking a plan with 1000 items is way harder than tracking one with 25-50 items. Keep it simple!

Following is a sample configuration page:


Picture

Once the plugin is configured, it is time to start creating the plans. Make sure you learn more about the functionality here.

PS: Check out the FAQ in case if you come across any unexpected issues.

Installation
Configuration
Usage
FAQ

SUPPORT
APPS
TUTORIALS
THE BOOK
© J-Tricks