J tricks - Little JIRA Tricks
  • Home
  • Plugins ↓
    • JQL Tricks Plugin
      • JQL Tricks Plugin - Cloud
        • JQLT Cloud Installation
        • JQLT Cloud Configuration
        • JQLT Cloud Usage
        • JQLT Cloud License
        • JQLT Cloud FAQ
      • JQL Tricks Plugin - DC
        • JQLT DC Installation
        • JQLT DC Configuration
        • JQLT DC Usage
          • JQLT Issue Functions
          • JQLT Subtask Functions
          • JQLT Links Functions
          • JQLT Development Functions
          • JQLT Worklog Functions
          • JQLT Project Functions
          • JQLT Component Functions
          • JQLT Version Functions
          • JQLT Group Functions
          • JQLT User Functions
          • JQLT Date Functions
        • JQLT DC License
        • JQLT DC FAQ
        • JQLT DC Known Issues
        • JQLT DC Performance
      • JQL Tricks Cloud Migration
    • Simplified Planner
      • J-Planner Installation
      • J-Planner Configuration
      • J-Planner Usage
        • Creating a plan
        • Editing a plan
        • Deleting a plan
        • Viewing a plan
        • Modifying a plan
      • J-Planner FAQ
    • Atla-Search Plugin
      • Atla-Search Installation
      • Atla-Search Configuration
      • Atla-Search Usage
      • Atla-Search License
      • Atla-Search FAQ
    • Copy to subtask Plugin
    • All Plugins
  • Tutorials
  • The Book
  • Contact Us

Writing JIRA4 Gadgets

3/12/2011

29 Comments

 
Gadgets are a big leap in the JIRA reporting feature! The fact that JIRA is now an OpenSocial container lets its user add useful Gadgets, both JIRA's own and third-party, into its dashboard. At the same time gadgets written for JIRA can be added in other containers like iGoogle, Gmail etc!

Let us have a look at writing a very simple gadget, one that says 'Hello from JTricks'. By keeping the content simple, it will let us concentrate more on writing the gadget!
Before we start writing the gadget, it is probably worth to understand the key components of a JIRA gadget.

  1. Gadget XML : This is the most important part of a JIRA Gadget. This holds the specification of the gadget and includes the following:

    a. Gadget Characteristics. It includes title, description, author's name etc
    b. Screenshot and a thumbnail image. Please note that the screenshot is not used within Atlassian Containers like JIRA or Confluence. We can optionally add it if we want them to be used in other Opensocial containers.
    c. Required features that the Gadget container must provide for the gadget.
    d. User preferences which will configured by the gadget users
    e. The Gadget Content created using HTML and JavaScript
  2. A Screenshot and thumbnail image. These will be used during preview and while selecting the gadget from the container.
  3. An i18n property file used for internationalization in the Gadget
  4. Optional CSS and Javascript files used to render the display in the Content section of the gadget
As usual, have your skeleton plugin ready. The first step obviously is to modify the plugin descriptor with the gadget module and the resources required for our gadget.
  • Add the Gadget module in the plugin descriptor.

    <gadget key="hello-gadget" name="Hello Gadget" location="hello-gadget.xml">
         <description>Hello Gadget! </description>
    </gadget>

    As you can see, this has a unique key and points to the location of the gadget XML! You can have as many gadget definitions as you want in your atlassian-plugin.xml but in our example we stick with the one above.
  • Include the thumbnail and screenshot images as downloadable resources in the plugin descriptor. We have seen details on this in previous chapter and more can be learned here. In our example, the resources are added on to the plugin descriptor as:

    <resource name="screenshot.png" location="/images/screenshot.png"/>
    <resource name="thumbnail.png" location="/images/thumbnail.png"/>

    The location is relative to the src/main/resources folder in the plugin. As mentioned before, screenshot is optional.
  • Add the i18n properties file that will be used in Gadget also as a downloadable resource.

    <resource name="i18n/messages.xml" location="i18n/messages.xml">
        <param name="content-type" value="text/xml; charset=UTF-8"/>
    </resource>
The atlassian-plugin.xml will now look like this:

    <atlassian-plugin key="com.jtricks.gadgets" name="Gadgets Plugin" plugins-version="2">
        <plugin-info>
            <description>Gadgets Example</description>
            <version>2.0</version>
            <vendor name="JTricks" url="http://www.j-tricks.com/" />
        </plugin-info>
        <gadget key="hello-gadget" name="Hello Gadget" location="hello-gadget.xml">
            <description>Hello Gadget!</description>
        </gadget>

        <resource name="screenshot.png" location="/images/screenshot.png"/>
        <resource name="thumbnail.png" location="/images/thumbnail.png"/>

        <resource name="i18n/messages.xml" location="i18n/messages.xml">
            <param name="content-type" value="text/xml; charset=UTF-8"/>
        </resource>
    </atlassian-plugin>


We now need to add the screenshot and thumbnail images under the src/main/resources/images folder. The thumbnail image should be of the size 120x60 pixels. We should also add the i18n properties file under the src/main/resources/i18n folder. The name of the filer we defined is messages.xml.

This file is an XML file en-wrapped within the messagebundle tag. Each property in the file is entered as an XML tag as shown below:

<msg name="gadget.title">Hello Gadget</msg>

The msg tag has a name attribute which is the property and the corresponding Value is enclosed in the msg tag. We use three properties in our example and the entire file in our example looks like the following:

<messagebundle>
    <msg name="gadget.title">Hello Gadget</msg>
    <msg name="gadget.title.url">http://www.j-tricks.com</msg>
    <msg name="gadget.description">Example Gadget from J-Tricks</msg>
</messagebundle>

Now the time has come to write he Gadget XML!

The Gadget XML has a Module element at the root of the XML. It has mainly 3 elements underneath - ModulePrefs, UserPref and Content. We will write of each of them in this example. The entire set of Attributes and Elements and other details of the Gadget Specification can be read here.
  • Write the ModulePrefs element. This element holds the information about the Gadget. It also has two child elements - Require and Optional that are used to define required or optional features for the gadget.

    Following is how the ModulePrefs element looks in our example after populated with all the attributes:

    <ModulePrefs title="__MSG_gadget.title__" title_url="__MSG_gadget.title.url__"
    description="__MSG_gadget.description__" author="Jobin Kuruvilla" author_email="jobinkk@gmail.com"        screenshot='#staticResourceUrl("com.jtricks.gadgets:hello-gadget", "screenshot.png")'
    thumbnail='#staticResourceUrl("com.jtricks.gadgets:hello-gadget", "thumbnail.png")' height="150"  >
    </ModulePrefs>

    As you can see, it holds information like title, title URL (to which the gadget title will link to), description, author name and email, height of the gadget and URLs to screenshot and thumbnail images.

    Anything that starts with __MSG_ and ends with __ is a property that is referred from the i18n properties file.

    The height of the gadget is optional and 200 by default. The images are referenced using #staticResourceUrl where the first argument is the fully qualified gadget module key which is of the form ${atlassian-plugin-key}:${module-key}. In our example the plugin key is com.jtricks.gadgets and the module key is hello-gadget.
  • Add the optional Gadget directory feature inside ModulePrefs. This is currently supported only in JIRA.

    <Optional feature="gadget-directory">
        <Param name="categories">
            Other
        </Param>
    </Optional>

    In the example, we add the category as Other!

    Other values supported for category are: JIRA, Confluence, FishEye, Crucible, Crowd, Clover, Bamboo, Admin, Charts and External Content.

    You can add the gadget to more than one category by adding the categories within the Param element, each in a new line.
  • Include Required features if there are any. A full list of supported features can be found here .
  • Add the Locale element to point to the i18n properties file.

    <Locale messages="__ATLASSIAN_BASE_URL__/download/resources/com.jtricks.gadgets/i18n/messages.xml"/>

    Here the property __ATLASSIAN_BASE_URL__ will be automatically substituted with JIRA's configured base URL when the gadget is rendered. The path to the property file here is __ATLASSIAN_BASE_URL__/download/resources/com.jtricks.gadgets where com.jtricks.gadgets is the atlassian plugin key. The path to XML /i18n/messages.xml is what is defined in the resource module earlier.
  • Add User Preferences if required, using the UserPref element. We will omit the same in this example as the 'Hello Gadget' doesn't take any inputs from the user.
  • Add the Content for the gadget. This is where the gadget is rendered using HTML and JavaScript. In our example, we just need to provide the static text 'Hello From JTricks' and it is fairly easy.

    The entire content is wrapped within the <![CDATA[ and ]]> so that they won't be treated as XML tags. Following is how it looks in our example:

    <Content view="profile">
        <![CDATA[ Hello From JTricks ]]>
    </Content>
Our Gadgets XML is now ready and looks like the following:

<?xml version="1.0" encoding="UTF-8" ?>
<Module>
    <ModulePrefs title="__MSG_gadget.title__" title_url="__MSG_gadget.title.url__" description="__MSG_gadget.description__" author="Jobin Kuruvilla" author_email="jobinkk@gmail.com" screenshot='#staticResourceUrl("com.jtricks.gadgets:hello-gadget", "screenshot.png")'  thumbnail='#staticResourceUrl("com.jtricks.gadgets:hello-gadget", "thumbnail.png")' height="150" >
        <Optional feature="gadget-directory">
            <Param name="categories">
                Other
            </Param>
        </Optional>
        <Locale messages="__ATLASSIAN_BASE_URL__/download/resources/com.jtricks.gadgets/i18n/messages.xml"/>
    </ModulePrefs>
    <Content view="profile">
        <![CDATA[ Hello From JTricks ]]>
     </Content>
</Module>


All we need to do now is to package the plugin and deploy it.

Once the plugin is deployed, we need to add the gadget in the JIRA dashboard. Following is how it appears in the Add Gadget screen. Note the thumbnail is the one we have in the plugin and also note that it appears in the Other section.
Picture
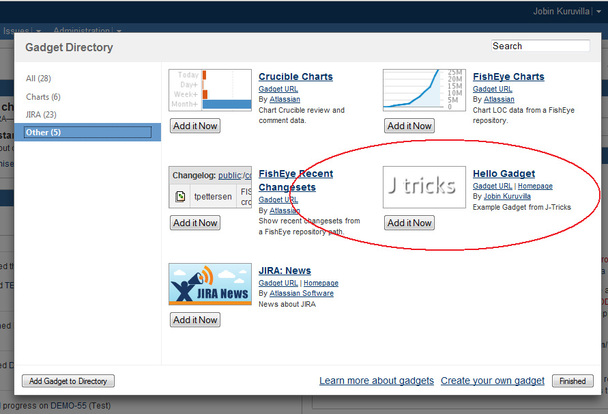
Once it is added, it appears like the following in the Dashboard.

Picture
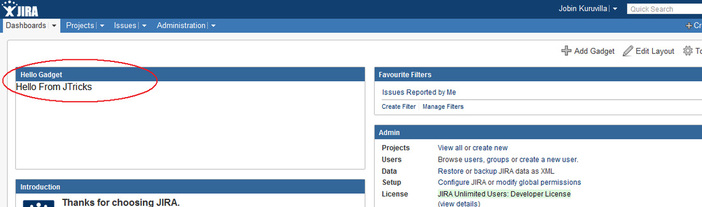
There it is! Our little Gadget!! If you think it doesn't look pretty, we can modify the look and feel of the gadgets by adding more HTML or Gadget preferences! For example:

<font color="red">Hello From JTricks</font> will make it appear in red!

We can adjust the size of the gadget using the dynamic-height feature. We should add the following under ModulePrefs element.

<Require feature="dynamic-height"/>

We should then invoke gadgets.window.adjustHeight(); whenever the content is reloaded. For example, we can do it in a window onload event like this:

                <script charset="utf-8">
                                function resize()
                                {
                                                gadgets.window.adjustHeight();
                                }
                                window.onload=resize;
                </script>

The gadget xml in this case will look like this:

<?xml version="1.0" encoding="UTF-8" ?>
<Module>
    <ModulePrefs title="__MSG_gadget.title__"
                 title_url="__MSG_gadget.title.url__"
                 description="__MSG_gadget.description__"
                 author="Jobin Kuruvilla"
         author_email="jobinkk@gmail.com"
                 screenshot='#staticResourceUrl("com.jtricks.gadgets:hello-gadget", "screenshot.png")'
                 thumbnail='#staticResourceUrl("com.jtricks.gadgets:hello-gadget", "thumbnail.png")'
         height="150"
                 >
        <Optional feature="gadget-directory">
            <Param name="categories">
            Other
        </Param>
        </Optional>
    <Require feature="dynamic-height"/>
    <Locale messages="__ATLASSIAN_BASE_URL__/download/resources/com.jtricks.gadgets/i18n/messages.xml"/>
    </ModulePrefs>
    <Content view="profile">
        <![CDATA[
    <script charset="utf-8">
        function resize()
        {
        gadgets.window.adjustHeight();
        }
    window.onload=resize;
    </script>
    Hello From JTricks
        ]]>
    </Content>
</Module>


The Gadget should now appear like this:
Picture

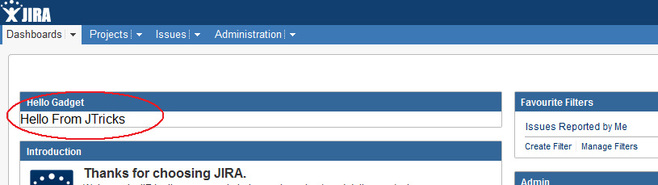
Well, that is only an example of what we can do! Learn about more of those at Atlassian Gadget Devlopment pages. Watch this space for more on invoking REST services from Gadgets and thus rendering dynamic content.

gadget-extended-plugin.zip
File Size: 20 kb
File Type: zip
Download File

29 Comments
Roger
5/4/2011 08:52:37 am

Hi J-Tricks,

Is it possible to put a gadget onto a Jira screen, in order to fetch external values into the DOM?

I see a lot about gadgets on the dashboard, but nothing about gadgets on screens.

Thanks!

Roger

Reply
J-Tricks
5/4/2011 08:58:29 am

You can put gadgets only into a Gadget container. JIRA's dashboard is an Opensocial gadget container. Other classic examples are iGoogle, Gmail etc.

Check this out : http://confluence.atlassian.com/display/GADGETDEV/Gadget+Containers

Reply
sudhir
10/5/2011 04:32:03 am

Hi J-Tricks,

Can we make a gadget which is visible only to specific user group in gadgets directory. or only a specific user/user-group say 'admin' can add this gadgets.

i am using url content type-
<Content type="url" href="__ATLASSIAN_BASE_URL__/plugins/servlet/admin_gadget" >
</Content>


Reply
J-Tricks
10/5/2011 09:03:58 am

@Sudhir Unfortunately, that is not possible. See https://jira.atlassian.com/browse/JRA-20167 for details.

You might be able to check the user in the gadget View and display content based on the user who is logged in!

Reply
Mark DeMichele
2/15/2012 01:30:04 pm

I'm trying to write a stand alone gadget. That is a gadget that doesn't require a plugin. Making a hello world type is easy, but I want to make one that makes a rest call on the target jira site and I can't seem to figure out how. Do you have any advice on that?

Reply
J-tricks
2/15/2012 01:53:39 pm

Some basics are discussed in this post : http://www.j-tricks.com/1/post/2011/04/invoking-rest-services-from-gadgets.html

Hope it helps!

Reply
Mark DeMichele
2/15/2012 02:08:41 pm

But that's for Gadgets that require a plug-in not stand alone ones. For instance thing like __ATLASSIAN_BASE_URL__ are no available if you don't use a plug-in.

J-Tricks
2/15/2012 02:20:27 pm

@Mark But isn't that the only thing that is not available? You can replace that with the actual baseURL.

Btw, what do you mean by a standalone gadget? http://code.google.com/apis/gadgets/docs/basic.html might be useful if you don't want to create it as a JIRA plugin.

Reply
Mark DeMichele
2/16/2012 12:06:06 am

A stand alone gadget is one that you don't use a plugin and you just us e Javascript/Html and CSS inside the xml file and you host the xml file on another server (https://developer.atlassian.com/display/JIRADEV/Standalone+Gadget+Tutorial+-+Writing+a+JQL+Gadget).

The exact problem I'm having is that when i try to make an ajax request back tot he same jira server that gadget is running in I believe I'm getting a permission error, the json response has something like ("don't be evil") in it and I get no data.

Reply
J-tricks
2/16/2012 12:59:51 am

Got you! I am afraid I haven't tried it before but looks like the example is using OAuth. Maybe you can try it out!

Sebastian
6/1/2012 03:38:57 am

Hi,

can you tell me please how i can disable the gadget from beeing displayed if a user is not logged in?

Thanks!

Sebastian

Reply
J-Tricks
6/1/2012 03:51:54 am

I have posted an answer to your question in Answers. Hope it helps :)

Here it is once again:

Use roles-required param in the gadget definition in atlassian-plugin.xml.

<gadget key="key" name="Name" location="gadgets/xxx.xml">
<param name="roles-required">use</param>
</gadget>

Reply
Andris
7/20/2012 12:35:36 am

I seem to have some problems with making this gadget appear on the list of gadgets once plugin is deployed (It works if I add it manually using the xml file). Do I need to do something more for JIRA 5 to make it appear? Also, is finished source code of this tutorial available somewhere, so I could compare, what I've done wrong? Thanks

Reply
J-Tricks
7/20/2012 12:25:45 pm

Actually, all the files are exactly same as what is given above. If you can upload your plugin somewhere, we are happy to have a look.

Reply
Andris
7/22/2012 07:25:43 pm

I uploaded it here: http://www.2shared.com/file/nbjWjxmY/hello-gadget.html

Once deployed, the plugin appears correctly in the administration window: http://i.imgur.com/AtMUH.png

However it is not visible in the gadget window: http://i.imgur.com/BYtKa.png

I'm pretty sure the mistake I've made is something extremely simple and stupid, because that gadget works fine if I add it manually (apart from not showing the thumbnail/screenshot).

Thank you for your help.

J-Tricks
7/24/2012 04:44:00 am

It started working for me once I put a double quotes around email. Try that!

srikanth
8/21/2012 12:04:45 am

where should i need to place my gadget.xml file in order to appear it in jira gadget directory and also how to give url to the xml


Thanks in advance

Reply
J-Tricks
8/21/2012 02:34:58 am

Put it under resources in your plugin and give the relative path in the location attribute of gadget definition in the atlassian-plugin.xml.

Reply
learning technical writing link
9/20/2012 11:36:29 pm

You have really helped several of individuals like me, who have been searching internet from past quite a long time to find detailed information on this particular topic. Thanks a ton.

Reply
J-Tricks
9/21/2012 01:43:17 am

Glad you found it useful. Cheers :)

Reply
learning technical writing link
9/20/2012 11:47:10 pm

Great piece of writing, I really liked the way you highlighted some really important and significant points. Thanks so much, I appreciate your work.

Reply
windows 8 system requirements link
3/31/2013 11:50:56 pm

Plug-ins is added on programs that increases the extension of a program. The young professionals from j-tricks develop plug-ins for JIRA. The open source plug-ins you provided is very useful and increases the program’s performance. It is very glad to hear that you are partner of Go2Group.

Reply
Ammu link
4/3/2013 07:51:01 pm

I have added a plugin in JIRA. But i am not able to find that in the gadget directory. Can any one help me. I also needto know how to use the XML file in Tomcat instead of IIS.

Reply
J-Tricks
4/4/2013 01:01:43 am

Is the plugin successfully installed? Are you able to find it under UPM, with all the modules enabled? If so, any error in the logs?

Not sure what you mean by using the XML file in Tomcat!

Reply
Jayashree
4/15/2014 04:13:57 pm

Hi. I am also facing the similar problem. No errors but the gadget doesnot appear in the other's directory. Also i have tried the invoking of rest, i end up getting some resource related error.<Locale? message doesnot work.i want to use REST 2.0 what changes needs to be done. Can you please update the REST code JIRA4 gadgets since it has some error when i try to run it

Reply
J-Tricks
4/25/2014 09:06:36 am

Jayashree,

Check out the attached code and see if it works!

Reply
Jayashree
4/28/2014 10:55:28 pm

Thank you , it worked :)

Jayashree
5/7/2014 05:14:45 pm

Hi Jobin, can you post the implementation of gadget with rest service displaying the projects in jira as a select list?

Reply
John McGahlot
4/21/2015 07:37:14 pm

how to generate the config form again and again to select multiple projects on the click of a check box

Reply

Your comment will be posted after it is approved.


Leave a Reply.

    Enter your email address:

    Author

    Jobin Kuruvilla - Works in Adaptavist as Head of DevOps Professional Services. 

    Author of JIRA Development Cookbook and JIRA 5.x Development Cookbook.


    RSS Feed

    Categories

    All
    Acive Objects
    Ajs
    Book
    Components
    Condition
    Custom Fields
    Customization
    Events
    Gadgets
    Javascript
    Jql
    Listener
    Mail
    Permissions
    Plugin Framework
    Post Function
    Properties
    Remote Invocation
    Reporting
    Rest
    Scheduled Tasks
    Search
    Services
    Soap
    Summit
    User Interface
    Validator
    Webwork Actions
    Workflow

    Archives

    October 2016
    August 2016
    March 2016
    January 2016
    December 2015
    May 2014
    December 2013
    November 2013
    July 2013
    June 2013
    April 2013
    October 2012
    September 2012
    August 2012
    July 2012
    May 2012
    March 2012
    February 2012
    January 2012
    December 2011
    November 2011
    June 2011
    May 2011
    April 2011
    March 2011
    February 2011
    January 2011
    November 2010
    October 2010
    September 2010
    August 2010

SUPPORT
APPS
TUTORIALS
THE BOOK
© J-Tricks