J tricks - Little JIRA Tricks
  • Home
  • Plugins ↓
    • JQL Tricks Plugin
      • JQL Tricks Plugin - Cloud
        • JQLT Cloud Installation
        • JQLT Cloud Configuration
        • JQLT Cloud Usage
        • JQLT Cloud License
        • JQLT Cloud FAQ
      • JQL Tricks Plugin - DC
        • JQLT DC Installation
        • JQLT DC Configuration
        • JQLT DC Usage
          • JQLT Issue Functions
          • JQLT Subtask Functions
          • JQLT Links Functions
          • JQLT Development Functions
          • JQLT Worklog Functions
          • JQLT Project Functions
          • JQLT Component Functions
          • JQLT Version Functions
          • JQLT Group Functions
          • JQLT User Functions
          • JQLT Date Functions
        • JQLT DC License
        • JQLT DC FAQ
        • JQLT DC Known Issues
        • JQLT DC Performance
      • JQL Tricks Cloud Migration
    • Simplified Planner
      • J-Planner Installation
      • J-Planner Configuration
      • J-Planner Usage
        • Creating a plan
        • Editing a plan
        • Deleting a plan
        • Viewing a plan
        • Modifying a plan
      • J-Planner FAQ
    • Atla-Search Plugin
      • Atla-Search Installation
      • Atla-Search Configuration
      • Atla-Search Usage
      • Atla-Search License
      • Atla-Search FAQ
    • Heroku for Compass App
      • Heroku for Compass Installation
      • Heroku for Compass Configuration
      • Heroku for Compass Usage
    • Copy to subtask Plugin
    • All Plugins
  • Tutorials
  • The Book
  • Contact Us

Invoking REST Services from Gadgets

4/13/2011

10 Comments

 
In the previous post we have seen how to write a gadget with static content. In this one, we will have a look at creating a gadget with dynamic content or the data that is coming from the JIRA server.

JIRA uses REST services to communicate between the gadgets and the server. We will see how to write REST services in the coming chapters. In this recipe, we will use an existing REST service.

Let us consider a simple modification to the Hello Gadget created in the previous tutorial to understand the basics of invoking REST services from gadgets. We will try to greet the current user by retrieving the user details from the server instead of displaying the static text: Hello From JTricks.

JIRA ships with some inbuilt REST methods one of which is to retrieve the details of the current user. The method can be reached in the URL: /rest/gadget/1.0/currentUser. We will use this method to retrieve the current user’s full name and then display it in the Gadget greeting. If the user’s name is Jobin Kuruvilla, the gadget will display the message as Hello, Jobin Kuruvilla.

Since we are only changing the content of the gadget, the only modification is required in the gadget XML which is hello-gadget.xml in our example. Only the Content element needs to be modified which will now invoke the REST service and render the content.

We first need to include the common Atlassian Gadget resources.

#requireResource("com.atlassian.jira.gadgets:common")
#includeResources()

#requireResource will bring in the JIRA Gadget Javascript framework in to the gadget’s context. #includeResources will write out the HTML tags for the resource in place. You will find more details in the link above.

Now we need to construct a Gadget object as shown below:

var gadget = AJS.Gadget

The Gadget object has 4 top level options.
  • baseUrl: An option to pass the base URL. It is a mandatory option and we use __ATLASSIAN_BASE_URL__  here which will be rendered as JIRA’s base URL.
  • useOauth: An optional parameter. Used to configure the type of authentication which must be a URL.  /rest/gadget/1.0/currentUser is commonly used.
  • config: Another optional parameter. Only used if there are any configuration options for the gadget.
  • view: Used to define the gadget’s view.
In our example, we don’t use authentication or any configuration options. We will just go with the baseUrl and view options. Following is how the Gadget is created in the javascript.

<script >
    (function () {
        var gadget = AJS.Gadget({
            baseUrl: "__ATLASSIAN_BASE_URL__",
            view: {
                ................
            }
        });
    })();
</script>

Now we need to populate the gadget view. The view object has the following properties.
  • enableReload: Optional. Used to reload the gadget at regular intervals.
  • onResizeReload: Optional. Used to reload the gadget when browser is resized.
  • onResizeAdjustHeight: Optional and used along with the dynamic-height feature. This will adjust the gadget height when the browser is resized.
  • template: Creates the actual view
  • args: An array of objects or function that returns an array of objects. It has 2 attributes. Key –used to access the data from within the template and ajaxOptions – set of request options used to connect to server and retrieve data.
In our example, we will use the template and args properties to render the view. First let us see args because we use the data retrieved here in the template. args will look like the following:

args: [{
    key: "user",
    ajaxOptions: function() {
        return {
            url: "/rest/gadget/1.0/currentUser"
        };
    }
}]

As you can see, we invoke the /rest/gadget/1.0/currentUser method and use the key user to refer the data we retrieved while rendering the view.     ajaxOptions uses the jQuery Ajax Options details of which can be found at http://api.jquery.com/jQuery.ajax#options .

The key user will now hold the user details from the REST method as follows:

{"username":"jobinkk","fullName":"Jobin Kuruvilla","email":"[email protected]"}

The template function will now use this args and its key, user to render the view as follows:

template: function(args) {
    var gadget = this;
             
    var userDetails = AJS.$("<h1/>").text("Hello, "+args.user["fullName"]);         
    gadget.getView().html(userDetails);
}
   
Here args.user["fullName"] will retrieve the user’s fullName from the REST output. username or email can be retrieved in similar fashion.

AJS.$ will construct the view as <h1>Hello, Jobin Kuruvilla</h1> where Jobin Kuruvilla is the fullName retrieved.

The entire Content section will look like this:

<Content view="profile">
    <![CDATA[
        #requireResource("com.atlassian.jira.gadgets:common")
            #includeResources()
     
            <script >
        (function () {
                var gadget = AJS.Gadget({
                    baseUrl: "__ATLASSIAN_BASE_URL__",
                    view: {
                    template: function(args) {
                        var gadget = this;             
                        var userDetails = AJS.$("<h1/>").text("Hello, "+args.user["fullName"]);             
                        gadget.getView().html(userDetails);
                        },
                        args: [{
                        key: "user",
                        ajaxOptions: function() {
                            return {
                                url: "/rest/gadget/1.0/currentUser"
                            };
                        }
                        }]
                }
                });
        })();
            </script>
        ]]>
</Content>

All that is left now is to package the gadget and deploy it. Once the plugin is deployed and gadget added to dashboard, it will appear as follows:
Picture
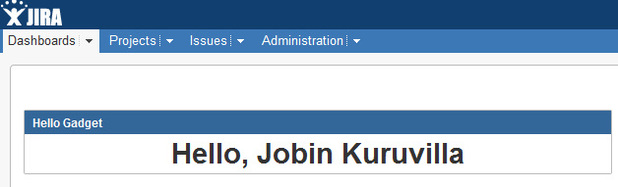
A round of applause please...
gadget-extended-plugin.zip
File Size: 20 kb
File Type: zip
Download File

10 Comments
borsch
7/5/2011 11:09:44 pm

Thanks for useful post.
Is it possible add full gadget.xml? I tried built this example and it didnt work. firebug said that gadget didnt send query to defined url.Im sure that I lost something specific detail. Could you show all gadget.xml?

Reply
J-Tricks
7/6/2011 07:48:52 am

@borsch I have attached the plugin in the post now. Hope it helps.

Reply
J-Tricks
9/27/2012 06:16:51 am

You can add canvas view if you need the maximise button. See https://answers.atlassian.com/questions/90995/why-gadget-have-no-maximize-button for details.

Also see https://developer.atlassian.com/display/GADGETS/Creating+your+Gadget+XML+Specification

Reply
Matthias Erl
12/2/2012 07:40:16 pm

Hello,
I´m developing a Gadget for JIRA 5.0.6 that shows the current number of open and closed Issues in a project. Furthermore, it should show the current progress of a project in a percentage value.

My Problem is, that the gadget does not refresh the data when I press the reload button.
For example:
When I create or delete an issue, the gadget just show the old data.
I used the UserPref refresh and the enableReload attribute.

Is there any possibility to execute the REST request manually when the gadget is rendered?

I hope can give me some hints.

Here is some code I used in my gadget and could be relevant for my problem:
The UserPref for refresh:
<UserPref name="refresh" datatype="hidden" default_value="false"/>

The view part:
view: {
enableReload: true,
onResizeReload: true,
onResizeAdjustHeight: true,
template: function(args) {
gadget = this;
....
}
}

The args part:
args: [{
key: "issueData",
ajaxOptions: function() {
return {
contentType: 'application/json',
url: "/rest/api/2/search?project=PBM&startAt=0&maxResults=1000&fields=summary,customfield_10612"
};
}
}]

Thank you very very much!

Best regards,
Matthias

Reply
J-Tricks
12/3/2012 02:37:31 pm

Matthias,

You said the results are not updated on the gadget when you reload. But are the results updated if you search the same thing in Issue Navigator?

Reply
Matthias
12/5/2012 06:47:40 pm

Thanks for your fast answer.

No, when I put the jql-Query (project=PBM&startAt=0&maxResults=1000&fields=summary,customfield_10612) in the Issue Navigator Search Field I get the message, that the fields startAt, maxResults and fields does not exist but the navigator shows all current issues and data.

But when I put the REST URL in the adress field of my firefox browser I got the correct data in JSON.

Basically the REST request works but I do not get the correct current data.
Should the REST request be executed everytime the gadget was refreshed? Or can I do a manuel execution of the REST in my Code?

Thank you very much.
Best regards,
Matthias

Accounting services plantation link
3/29/2013 11:28:26 pm

I acknowledge with most of your points, because this articles gives the light in which we can observe the reality and I take positive details on this amazing blog web page. It is very effective data provide me as well as and new encounter understand from it.

Reply
Matthew T. Baker
10/16/2014 03:48:14 am

Thanks for the tutorial. Is this still valid though as when adding to the dashboard "via Add it now" all I see is: #requireResource("com.atlassian.jira.gadgets:common") #includeResources() printed in the widget.

Reply
J-Tricks
10/16/2014 07:32:51 am

What version of JIRA is it? There might be some changes but I wouldn't think they will be major changes, even if there are any.

Reply
Coyotetools link
11/25/2022 11:56:43 am

I have read this post. Its so nice and very informative! thanks for sharing! Your website and blog is awsome!!!

Reply

Your comment will be posted after it is approved.


Leave a Reply.

    Enter your email address:

    Author

    Jobin Kuruvilla - Works in Adaptavist as Head of DevOps Professional Services. 

    Author of JIRA Development Cookbook and JIRA 5.x Development Cookbook.


    RSS Feed

    Categories

    All
    Acive Objects
    Ajs
    Book
    Components
    Condition
    Custom Fields
    Customization
    Events
    Gadgets
    Javascript
    Jql
    Listener
    Mail
    Permissions
    Plugin Framework
    Post Function
    Properties
    Remote Invocation
    Reporting
    Rest
    Scheduled Tasks
    Search
    Services
    Soap
    Summit
    User Interface
    Validator
    Webwork Actions
    Workflow

    Archives

    October 2016
    August 2016
    March 2016
    January 2016
    December 2015
    May 2014
    December 2013
    November 2013
    July 2013
    June 2013
    April 2013
    October 2012
    September 2012
    August 2012
    July 2012
    May 2012
    March 2012
    February 2012
    January 2012
    December 2011
    November 2011
    June 2011
    May 2011
    April 2011
    March 2011
    February 2011
    January 2011
    November 2010
    October 2010
    September 2010
    August 2010

SUPPORT
APPS
TUTORIALS
THE BOOK
© J-Tricks