
|
With the evolution of JIRA over the years, it has a set of nice APIs or helper methods for doing pretty much everything. But one thing that I always have to look up while developing plugins is using date and user pickers in a velocity template. As usual, it is something that is really easy once you look it up. Here is a simplified version of what I have done in the last few versions of JIRA. Let us create a sample plugin with a simple webwork action. How about an alias of Picker? Is there a more obvious name to call this example? ;) <webwork1 key="picker-module" name="PickerModule" i18n-name-key="picker-module.name"> <description key="picker-module.description">Sample date and user picker in velocity templates</description> <actions> <action name="com.jtricks.jira.webwork.Picker" alias="Picker"> <view name="success">/templates/picker-module/picker/success.vm</view> </action> </actions> </webwork1> As you can see, we just have a simple webwork actions and a velocity template associated with the success view. All we are going to do here is to create a form in the view with sample picker fields. I have generalized methods so that you can use it for as many picker fields as you want on the same page. Date Picker field Really easy to do this! Couple of steps: 1. Add this macro in the beginning of the template. #macro(datePopup $inputId $inputButton $dateFormat) <script language="javascript" > Calendar.setup({ firstDay : 1, inputField : '$inputId', button : '$inputButton', align : 'Br', singleClick : true, showsTime : false, useISO8601WeekNumbers : false, ifFormat : '$dateFormat' }); </script> #end 2. Use the macro in the field group as shown below: <div > <label for="uniqueDateId">Date Field Name</label> <input id="uniqueDateId" name="name" /> <a href="#" id="uniqueDateId_trigger" title="Enter your date field"> <span ></span> </a> #datePopup("uniqueDateId" "uniqueDateId_trigger" $dateFormat) </div> That's it! As you can see, the input field has a unique id (uniqueDateId in this example) and the anchor tag has a matching id which of the format ${id_of_input_field}_trigger (uniqueDateId_trigger in this example). Make sure pass this input field Id and anchor id to the datePopup macro we created in step 1. The result is what you can see here: 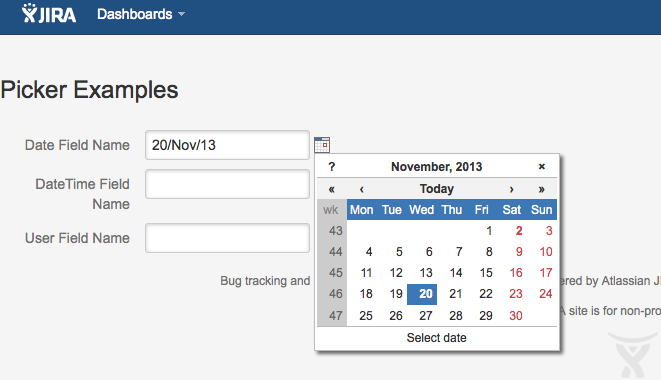 DateTime Picker field This is much similar to Date field, except for the number of arguments passed to the macro. It takes a date time format and a time format as opposed to the date format. Following are the steps: 1. Add a macro similar to what we did earlier. #macro(dateTimePopup $inputId $inputButton $dateTimeFormat $timeFormat) <script language="javascript" > Calendar.setup({ firstDay : 1, inputField : '$inputId', button : '$inputButton', align : 'Br', singleClick : true, showsTime : true, useISO8601WeekNumbers : false, ifFormat : '$dateTimeFormat', timeFormat : '$timeFormat' }); </script> #end The main difference is the formats. In the script, ifFormat uses a date time format instead of date format. There is also a timeFormat argument. Also showsTime argument is true instead of false. 2. Use the macro similar to what we did for datePopup. The unique ids should be just like what we did there. <div > <label for="uniqueDateTimeId">DateTime Field Name</label> <input id="uniqueDateTimeId" name="name" /> <a href="#" id="uniqueDateTimeId_trigger" title="Enter your date time field"> <span ></span> </a> #dateTimePopup("uniqueDateTimeId" "uniqueDateTimeId_trigger" $dateTimeFormat $timeFormat) </div> Unique input id is uniqueDateTimeId and anchor id is uniqueDateTimeId_trigger. Here is how the field will appear on screen: 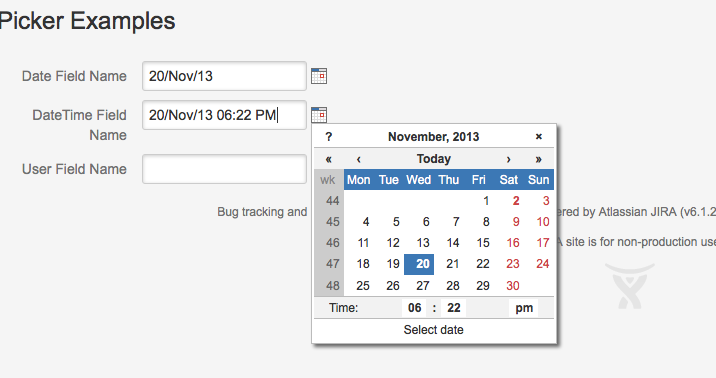 User Picker field User picker is slightly different. Here we make use of JIRA's user picker browser where you can search for users based on name, email or group. In the page, we click on the user picker icon to open up the user picker browser as a popup window and when you click on the search result, it fills the form back with the result selected. Steps are as follows: 1. Add a javascript function that opens up the user picker <script language="javascript" > function openUserPickerWindow(element){ var vWinUsers = window.open('$!requestContext.canonicalBaseUrl/secure/popups/UserPickerBrowser.jspa?formName=jiraform&multiSelect=false&element=' + element, 'UserPicker', 'status=yes,resizable=yes,top=100,left=200,width=580,height=750,scrollbars=yes'); vWinUsers.opener = self; vWinUsers.focus(); } </script> The openUserPickerWindow method just opens up a user picker browser popup with the element attribute as the source input id (element variable). Note that the formName in the example is jiraform and change it as appropriate. 2. Invoke the function when you click on the user picker icon. <div > <label for="uniqueUserId">User Field Name</label> <input id="uniqueUserId" name="lead"/> <a href="javascript:openUserPickerWindow('uniqueUserId');"> <img title="Ente the user name" name="multiuserImage" src="$!requestContext.canonicalBaseUrl/images/icons/filter_public.gif" hspace="0" height="16" width="16" border="0" align="absmiddle" > </a> </div> Here also the input field has a unique id (uniqueUserId in the example) and that is passed in the anchor tag. You can change the icon as you want in the image tag. Once added, the field appears on the form like this:  When you click on the user browser icon, it opens up the popup as shown below: 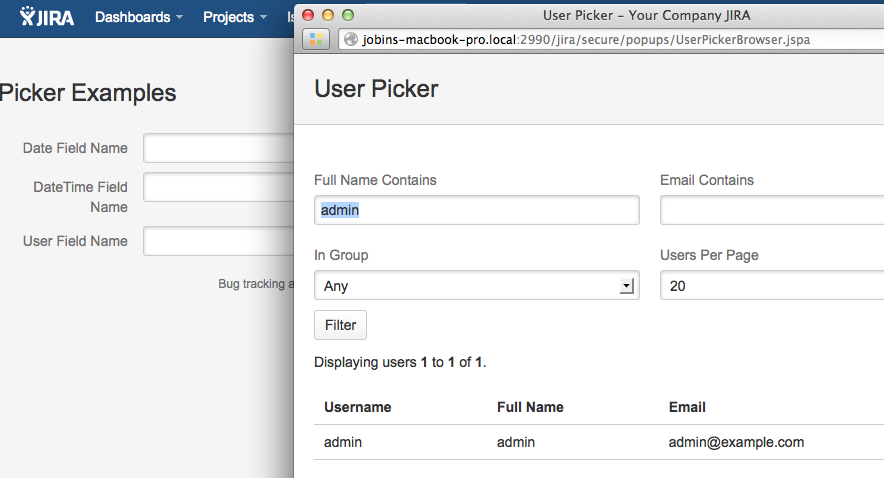 When you click on the 'admin' row, uniqueUserId on the form is populated as shown. 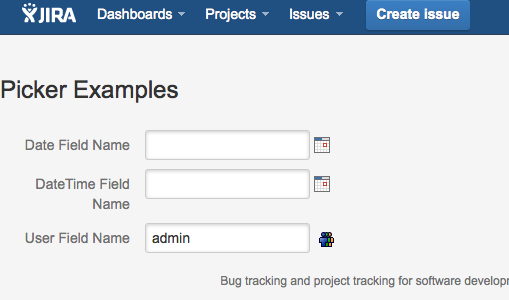 Yeah right, you have seen it a lot in JIRA ;) The example code is uploaded at the end of the tutorial and you can run the webwork action using the URL http://localhost:2990/jira/secure/Picker.jspa. That's all. 3 simple pickers, easy steps. How about the Ajax user search? Well, some other day :P
25 Comments
Deniz Oğuz
11/23/2013 11:52:18 pm
Hi
J-Tricks
11/24/2013 09:05:36 am
What is the plugin type? Which module is using the velocity template where you have defined the picker? 3/26/2014 12:00:44 am
Hi Jobin,
J-Tricks
3/31/2014 05:32:20 am
It will be a String. You can then parse in to a date with appropriate date format, if needed. 5/23/2014 09:51:20 pm
Hi J-Tricks team,
J-Tricks
5/26/2014 02:53:51 pm
Hi, 6/1/2014 03:20:23 am
Hello J-Tricks team,
J-Tricks
6/1/2014 03:09:50 pm
Hey Frédéric,
Ariel Rosa
8/4/2014 06:47:54 am
Hello, is it possible to add a User Picker field in a gadget configuration preference?
abdul ghaffar
12/22/2014 04:48:03 am
This post is very helpful. If you add date time format string, it will take guess work out
Srinivas Patruni
4/27/2015 12:31:36 pm
Can we enable only Saturdays?
J-Tricks
4/29/2015 09:34:00 am
Not using these functions. You will have to use a jquery plugin that supports it!
Juergen Hellwig
4/28/2015 05:55:36 am
At the end of the tutorial you find:
J-Tricks
4/29/2015 09:35:27 am
I wish it came faster. Too many things happening and so not enough time to do this! Please watch this space though!
Yusuf TAMBAĞ
7/19/2017 03:51:56 am
Passing class="single-user-picker js-default-user-picker" attribute to the input element should work (it worked for me).
Michael
5/26/2015 09:36:06 pm
Thanks for this good documentation.
J-Tricks
5/27/2015 02:18:53 am
Probably, the decorator doesn't include the web resources. You might want to try importing the necessary web resources using webresourcemanager.
Arun kumar
4/11/2016 06:15:01 am
Good example. Well done.
Nabil Sayegh
8/3/2016 07:21:37 am
Thank you.
J-Tricks
8/3/2016 10:38:31 am
If you have a popup or dialog, make sure the javascript is initialized when the popup is loaded. Code is the same.
Nabil Sayegh
8/17/2016 05:28:41 am
With popup I was refering to the "openUserPickerWindow".
J-Tricks
8/17/2016 01:38:28 pm
Ah ok. This usually happens when the id used is not the same as what you gave in the popup. Can you check again?
Nabil Sayegh
8/18/2016 03:35:12 am
The problem was unrelated to the popup. It was my unload handler: Your comment will be posted after it is approved.
Leave a Reply. |
AuthorJobin Kuruvilla - Works in Adaptavist as Head of DevOps Professional Services. Categories
All
Archives
October 2016
|
||
 RSS Feed